Posts Tagged: soup
Samgyetang
What is samgyetang?
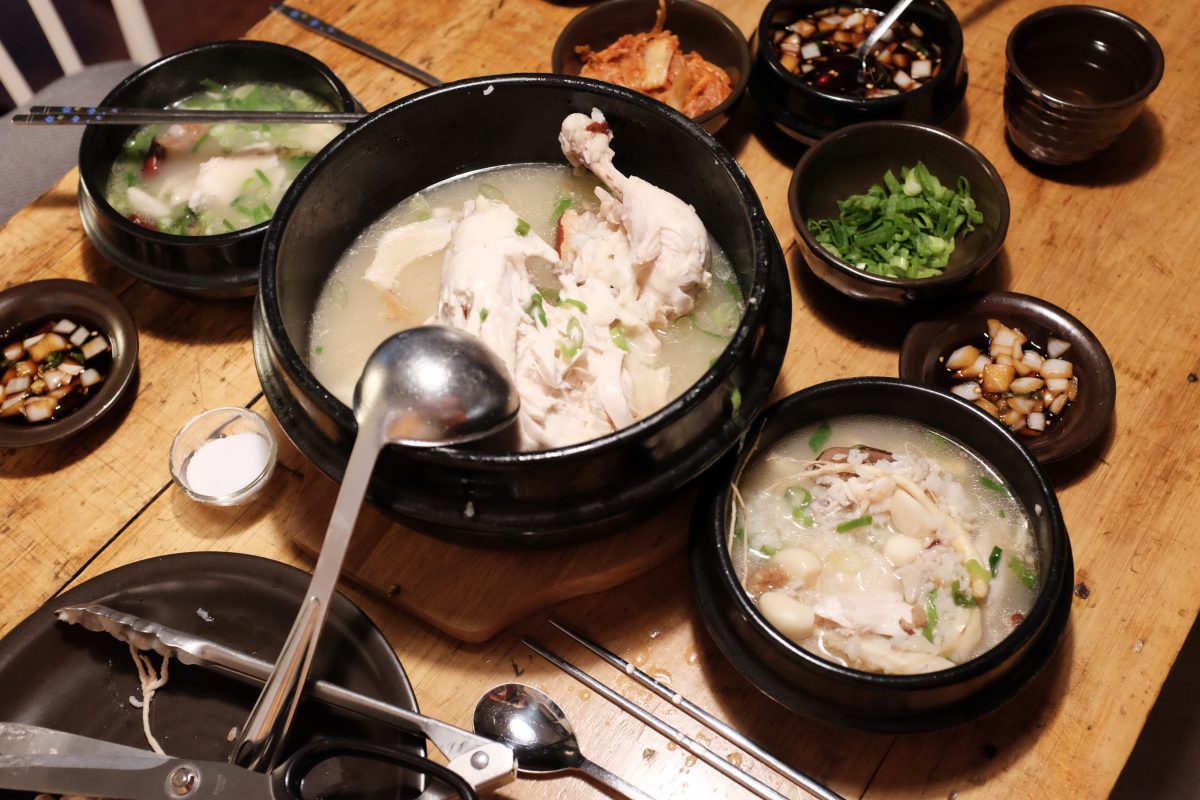
Samgyetang is ginseng chicken soup. “Sam” for insam (인삼), the Korean word for ginseng; “gye” refers to chicken; “tang”(탕) is a soup. It is a hearty and delicious soup that tastes great during chilly months. It is also surprisingly popular during the hottest days of the year in Korea where eating steaming hot food is believed to have a cooling effect on the body.
My first time…
The first time I ate this soup was on a chilly afternoon in Seogwipo City on Jeju Island. Hungry and cold, I was wandering around an area known for restaurants. It was the off-season so many restaurants were closed and most others were serving Jeju black pig samgyeopsal, something that is difficult to eat on your own. Feeling defeated, I decided to go to a nearby convenience store to at least buy some kimbap. On my way I spotted a small house with a sign that simply said “삼계탕” (samgyetang) but this little house didn’t look like a restaurant at all.
When I cracked the door open to peek inside, I was surprised to see an older woman sitting on the floor in front of her sofa, watching TV. I quickly apologized and tried to leave, but she got up and gestured for me to come inside. Hardly knowing any Korean, I simply said “samgyetang”? She nodded and gestured for me to sit on the sofa. She unfolded a small square table in front of me and then disappeared. I sat alone in this room, watching TV and silently wondering if I had made some kind of a mistake. But, a few minutes later, she came back smiling and put 2 or 3 dishes of simple banchan on the table in front of me. And, a little after that, she came back with a steaming black earthenware bowl containing a single small chicken in a bubbling broth.
I ate this delicious steaming meal as fast as I could without burning my mouth. The woman seemed pleased when she saw all the empty plates. I gestured to pay, she accepted my money with a nod and a smile and I was on my way.
That meal seems like a mystery to me to this day. Was it really a restaurant? Was it a dream? It seemed like some kind of a magical chapter in a book. Someday I will return to investigate. These are the best kinds of travel experiences. There is something deeply lonely about traveling by yourself, but I think that it also opens many doors that may not have otherwise materialized at all. Like the door to this little house where I first ate samgyetang on a chilly afternoon on Jeju Island, perched on the edge of a sofa watching TV.
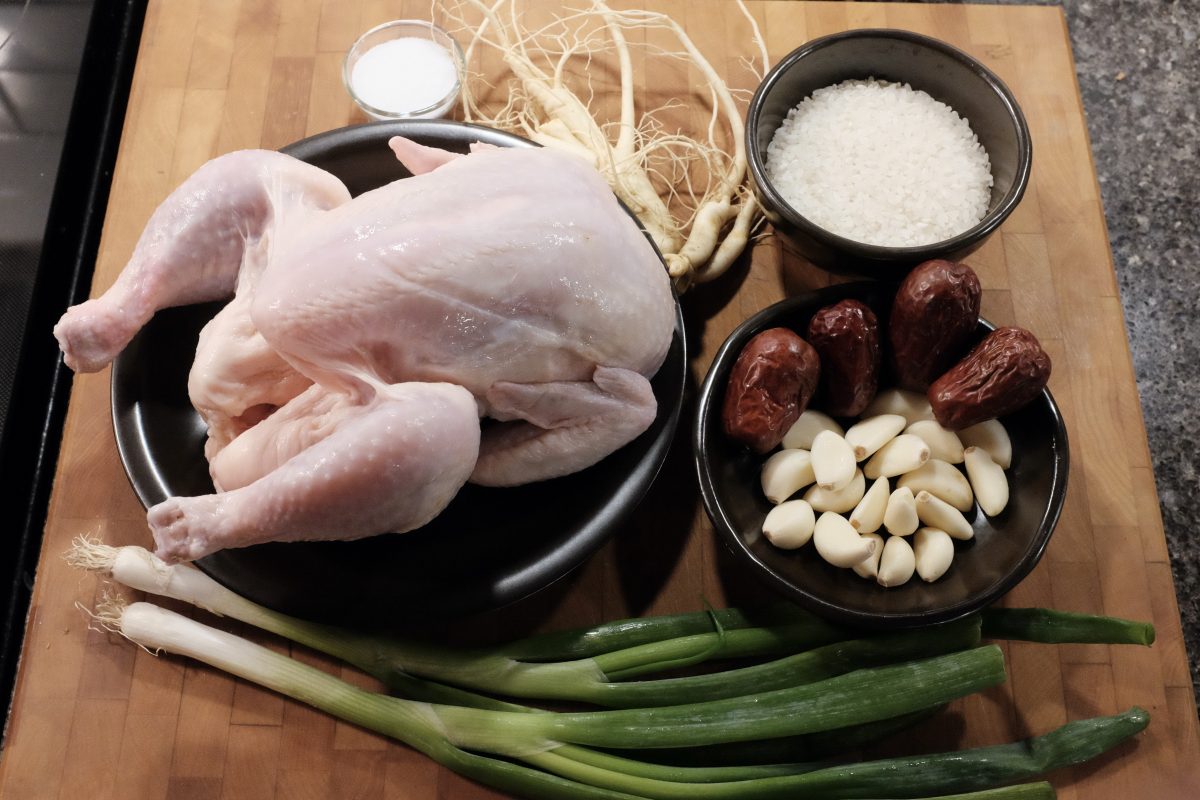
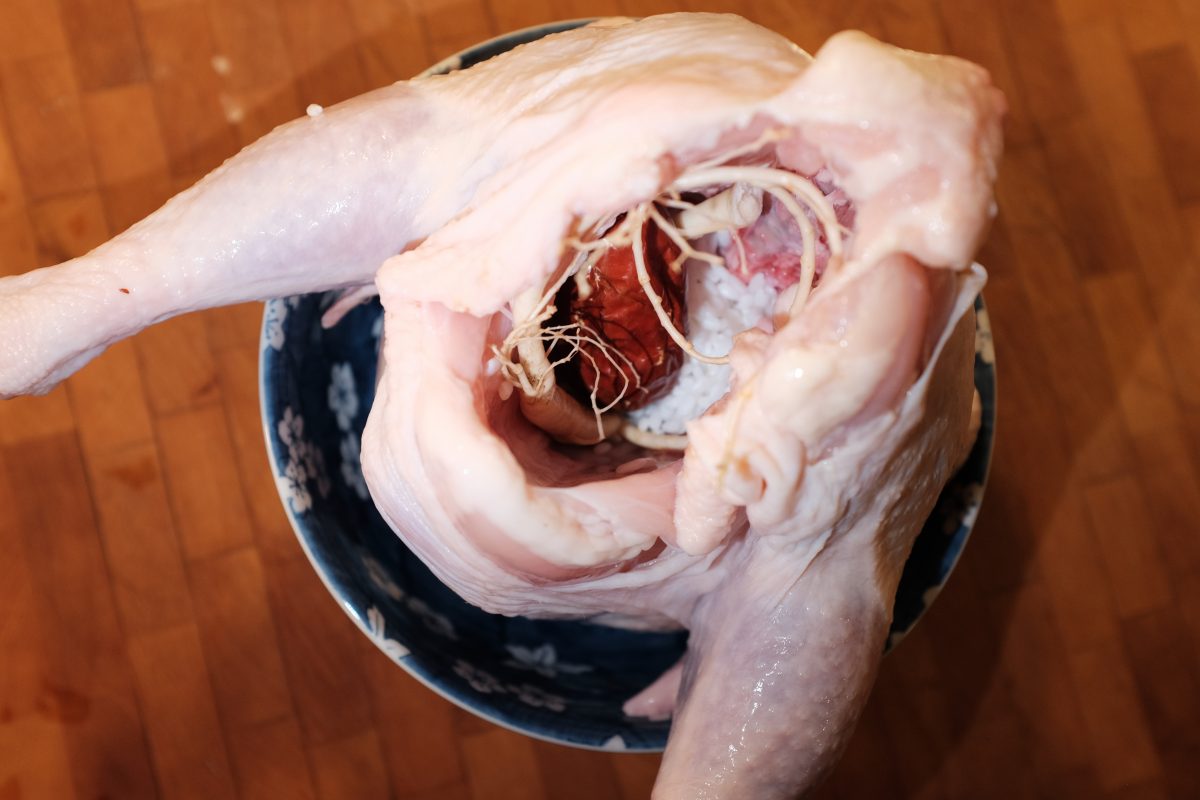
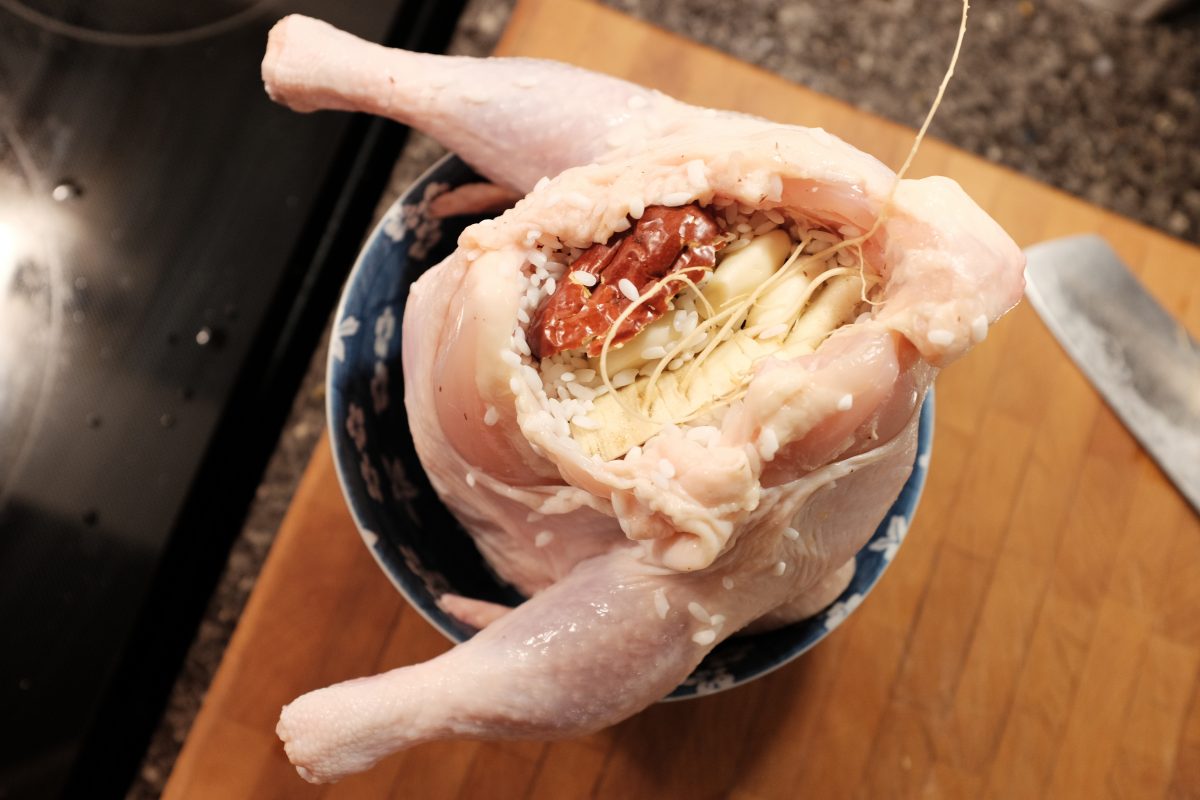
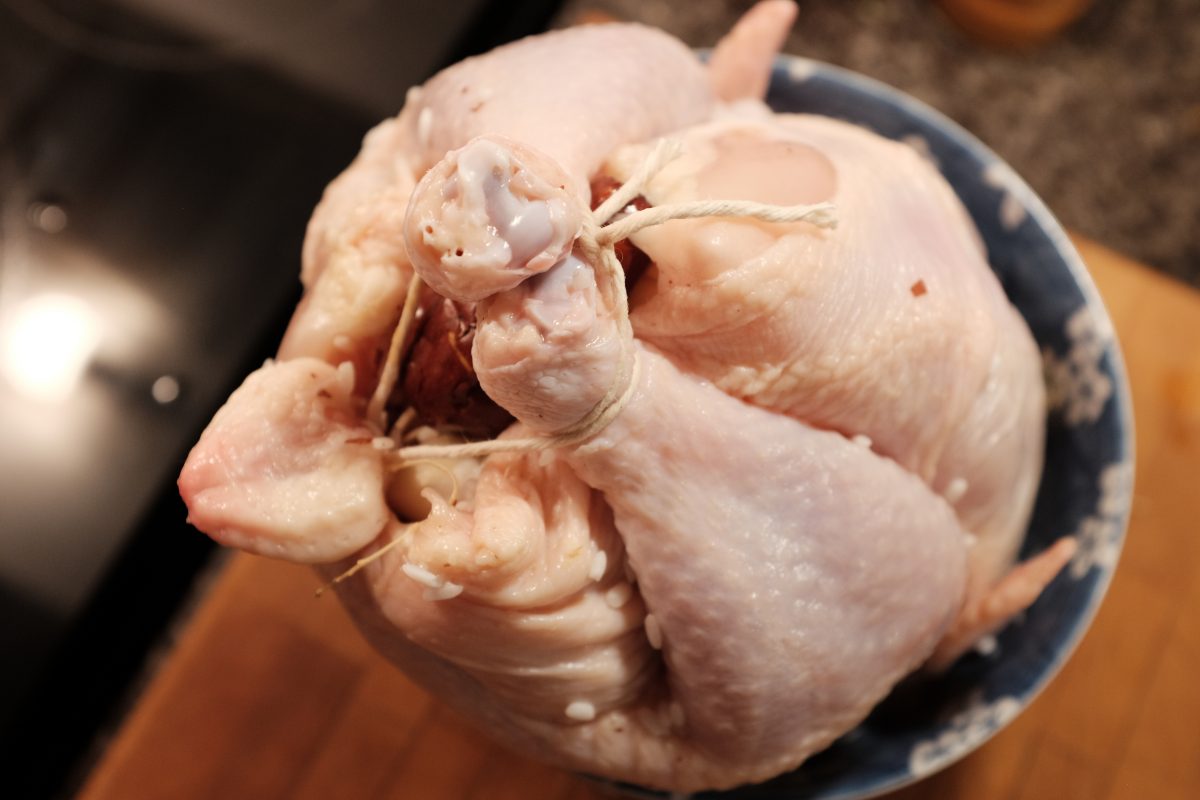
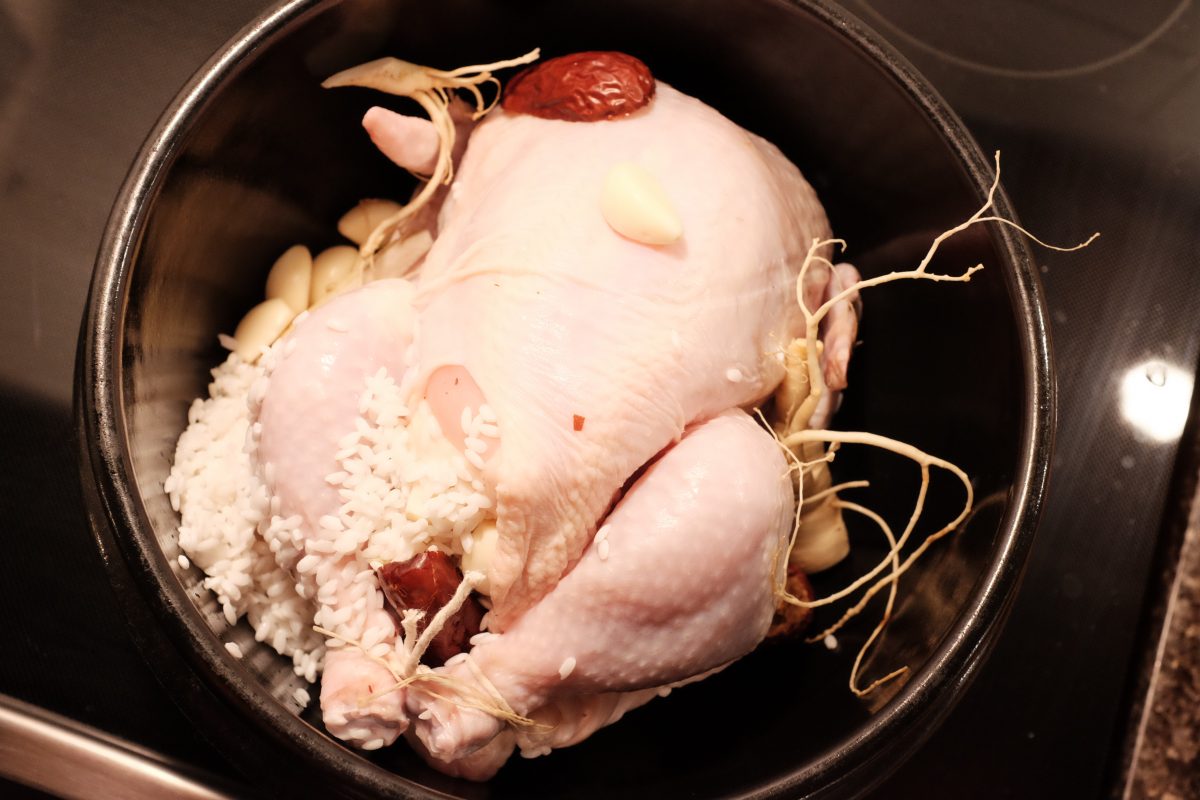
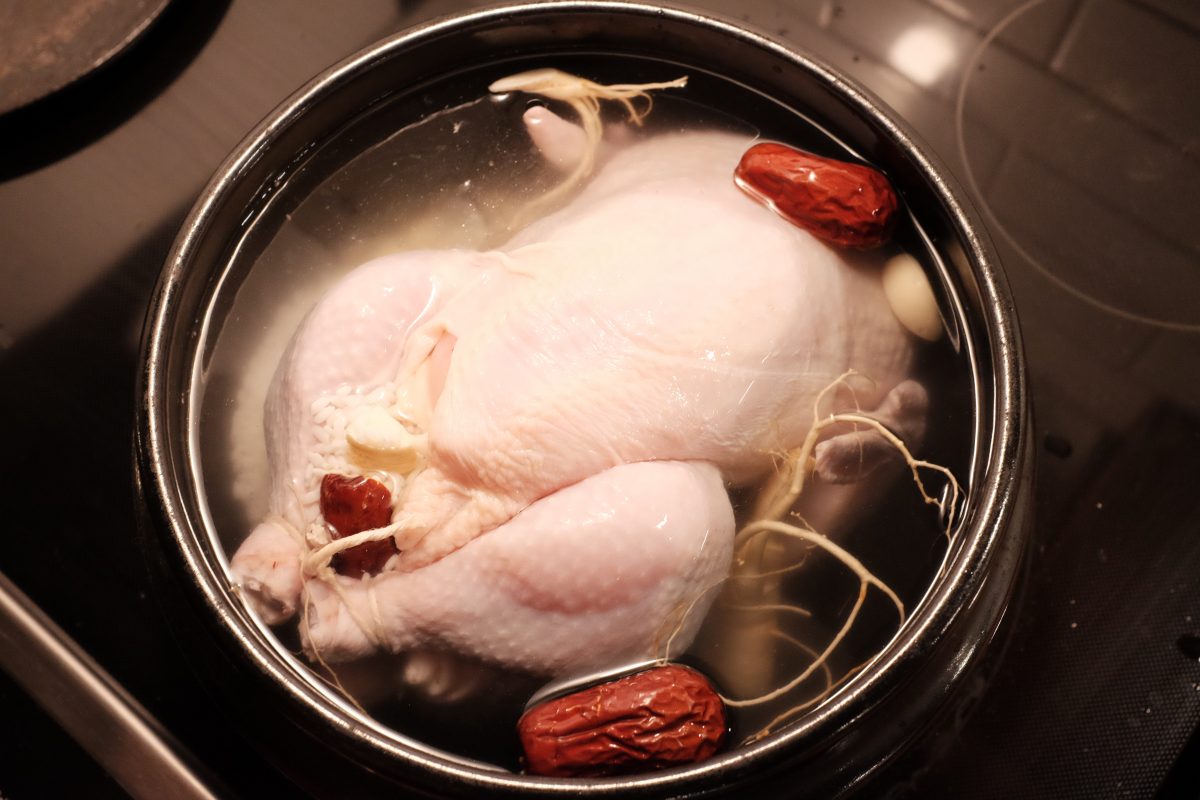
Ingredients
I made this recipe in a single large pot with a small whole chicken to eat family style. If you prefer, you can also make 2 separate portions out of this using the same amount of ingredients and 2 Cornish hens instead. It looks prettier when you serve each person their own whole bird and it is a lot less messy. Chickens are quite a bit less expensive and easier to find than Cornish hens so this is what I usually use.
- 1 small to medium chicken (or 2 cornish hens)
- 15-20 whole cloves of garlic
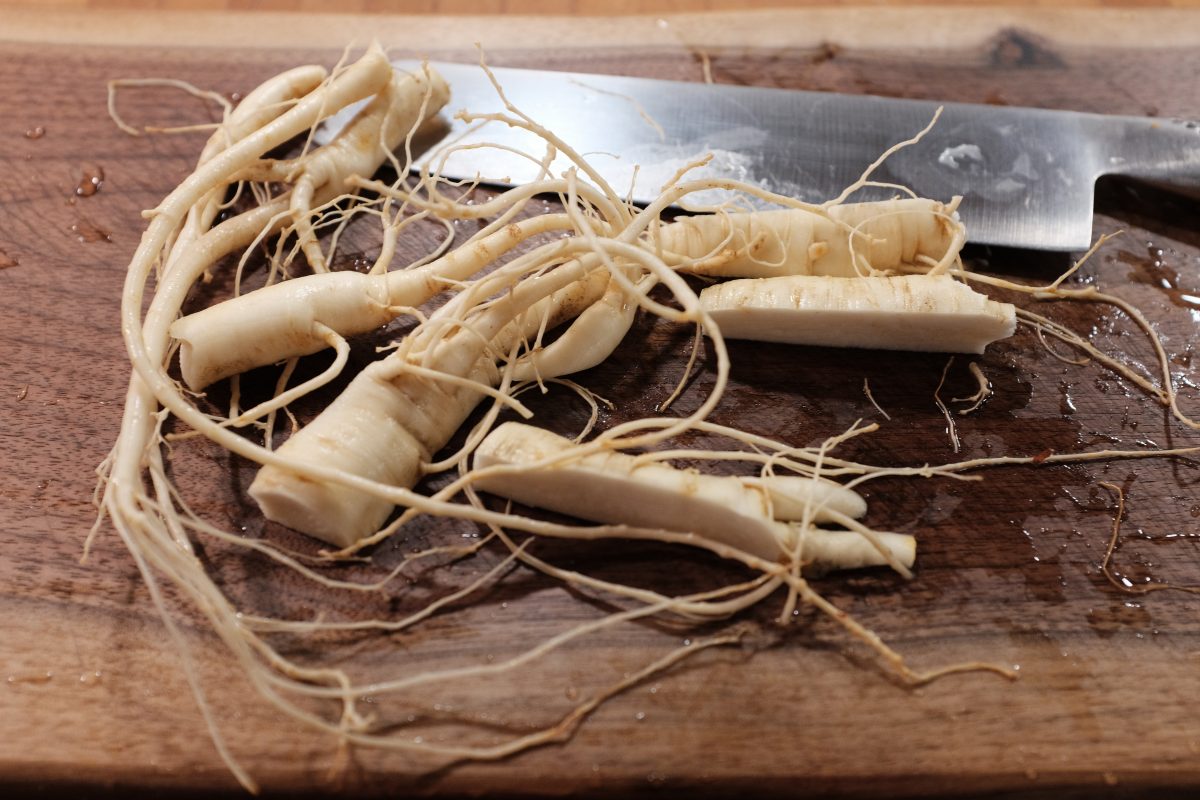
- 2 fresh ginseng roots
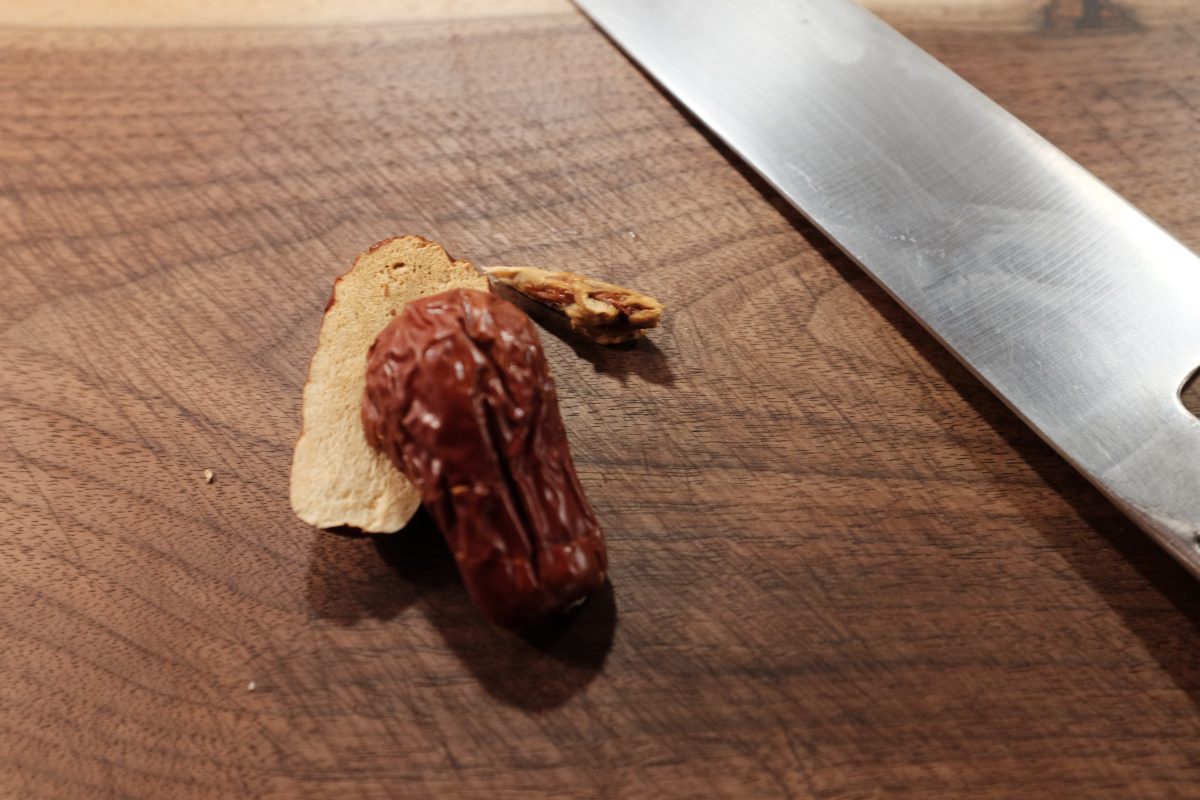
- 4 dried red dates (jujubes/daechu)
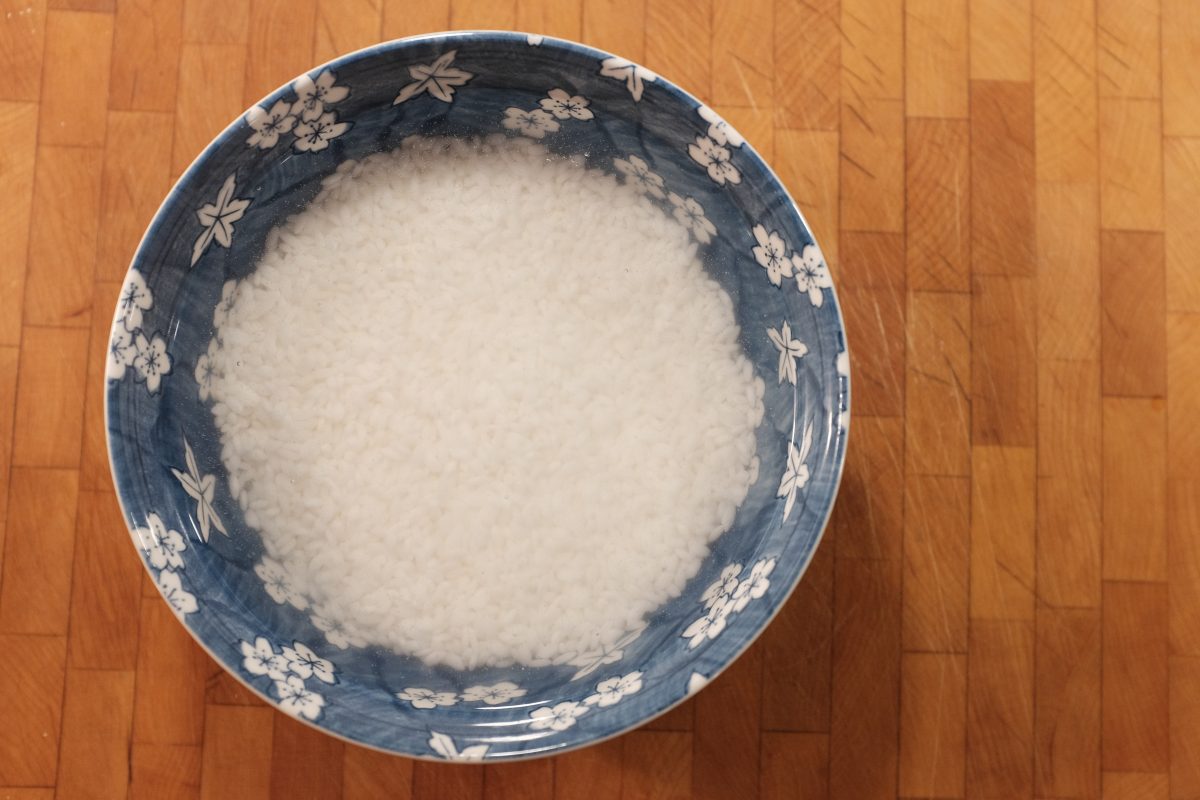
- 1 cup short grain rice (you can substitute with glutinous rice/chapssal)
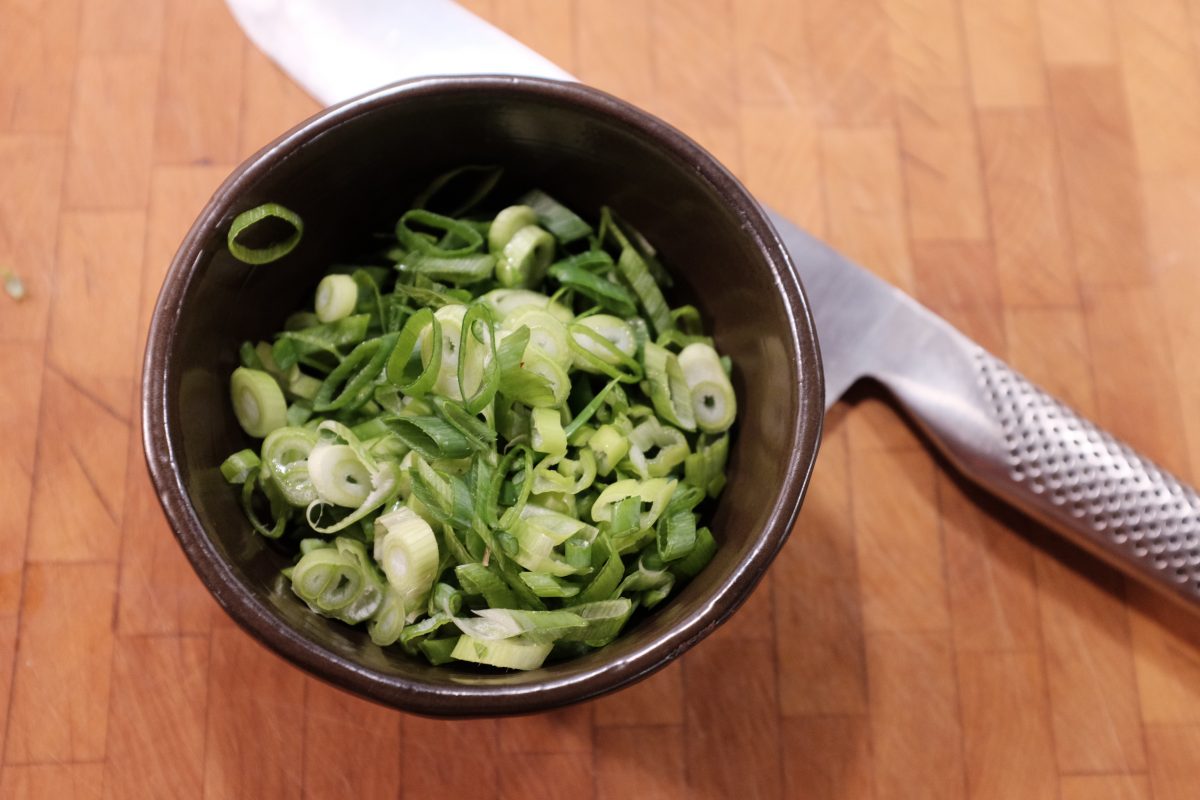
- 2 green onions
- salt and pepper
I am always able to find fresh ginseng at Asian grocers. Same goes for red dates: you may see these called Chinese red dates, jujubes or daechu (대추).
***At the end of the soup recipe there is a recipe for dipping sauce to go with it. Scroll to the bottom for that one. You can make it while your chicken is cooking.
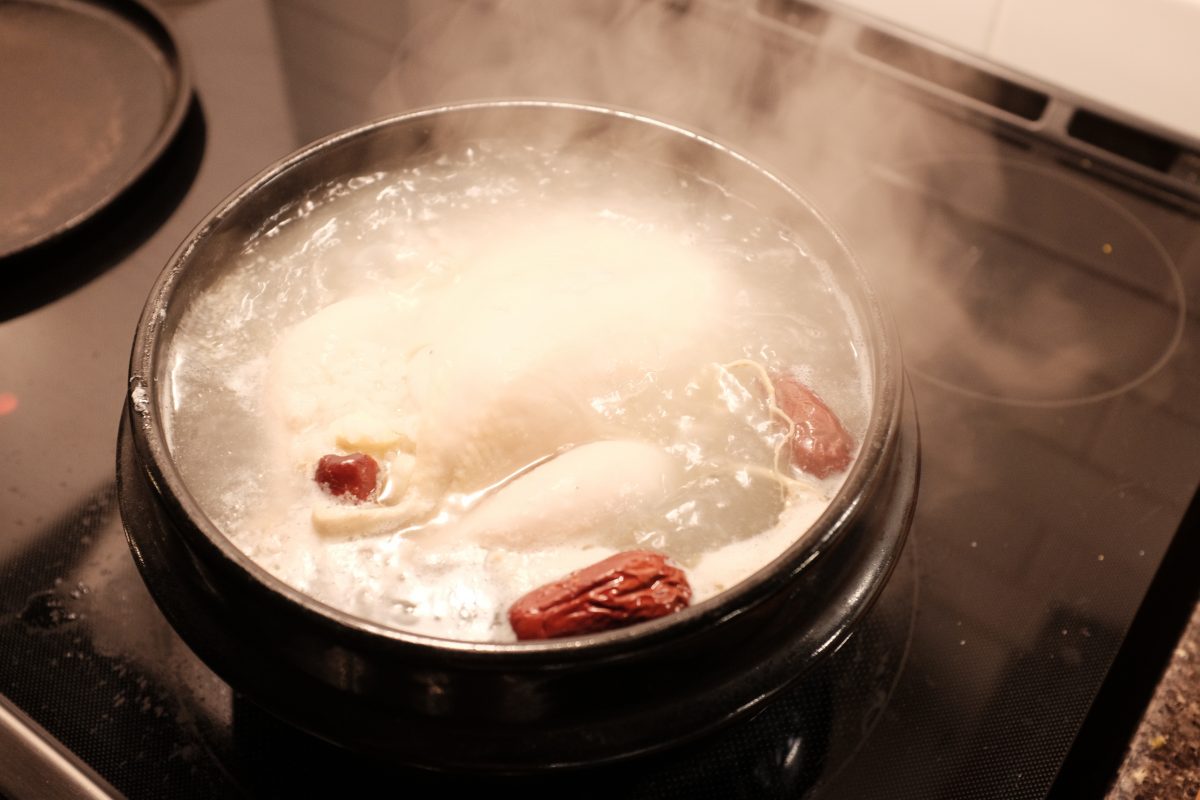
Process


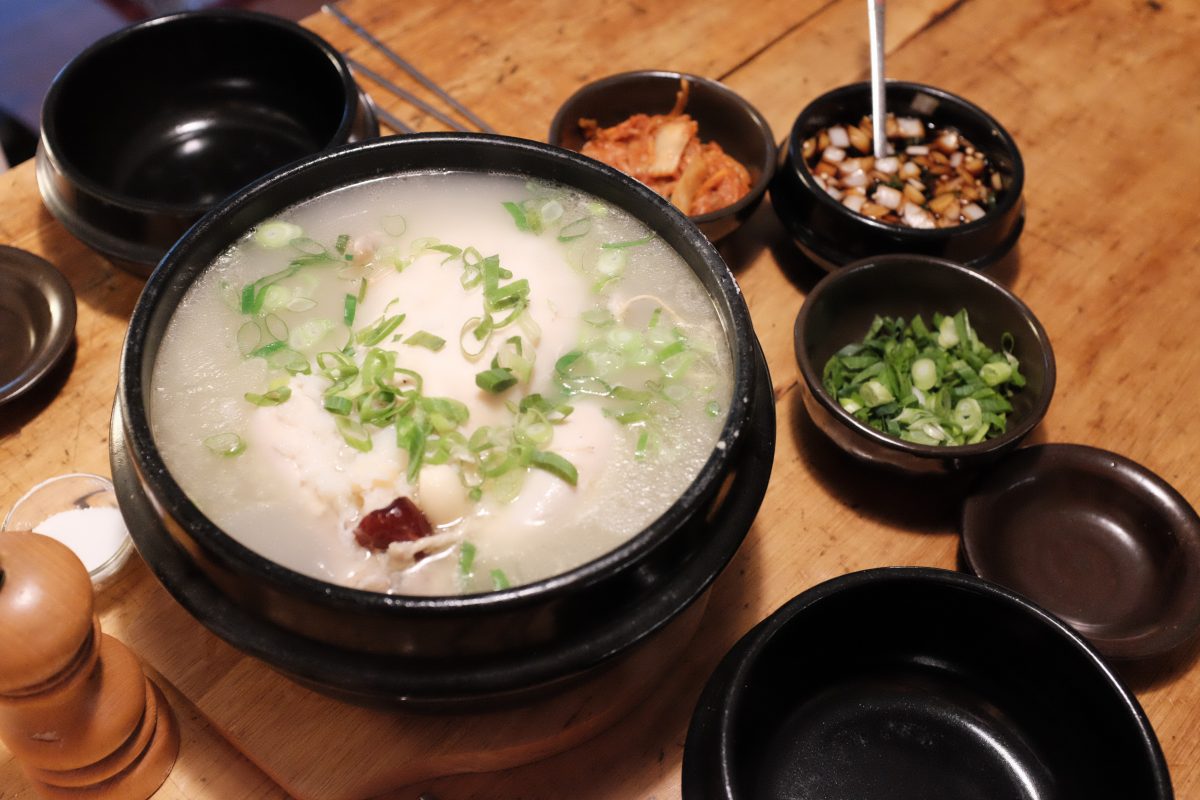
Serving
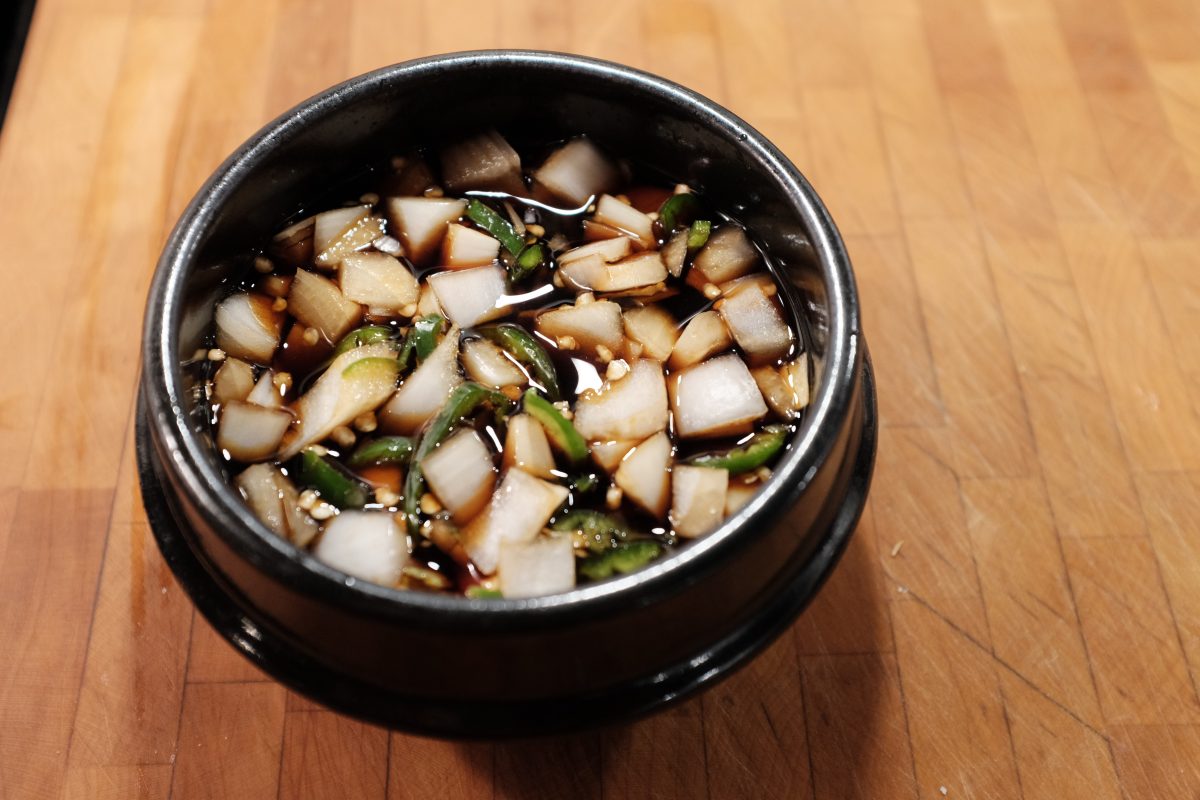
Soy and vinegar dipping sauce
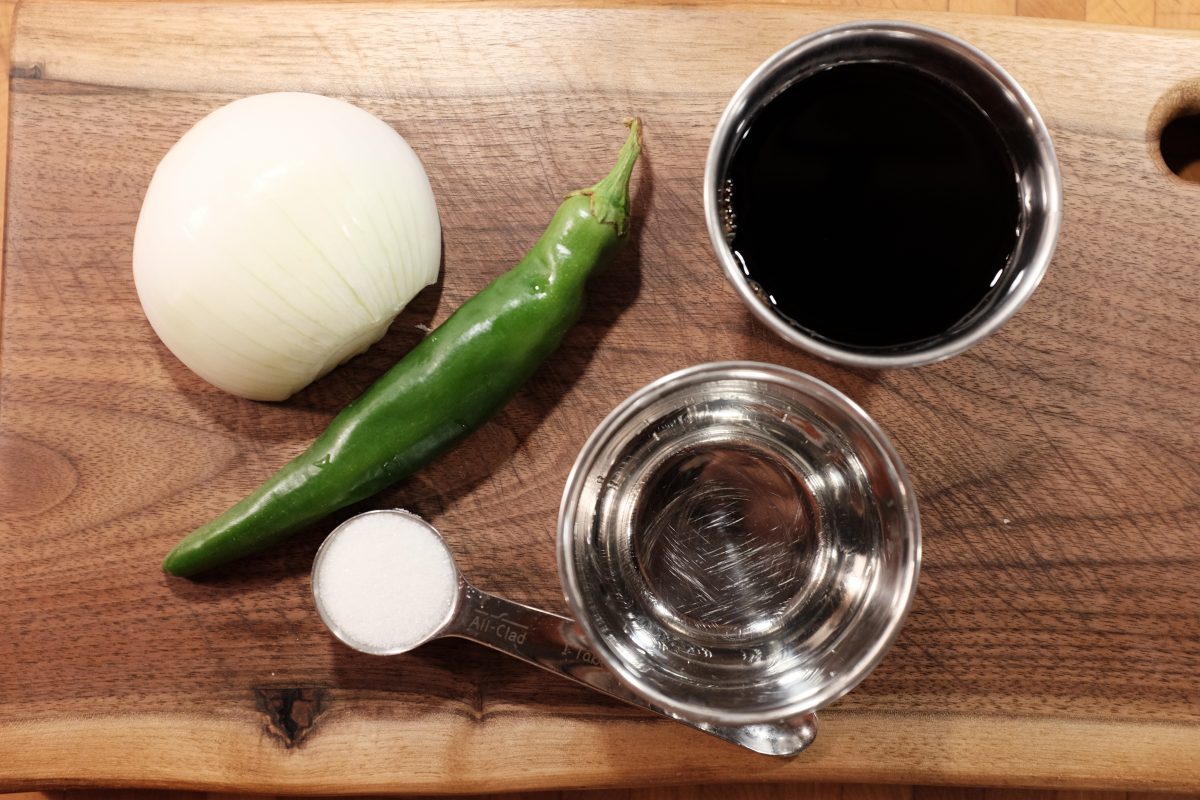
Ingredients
- 100ml (around 6 tablespoons) brewed soy sauce
- 50ml (around 3 tablespoons) white vinegar
- 12-13gr (1 tablespoon) white sugar
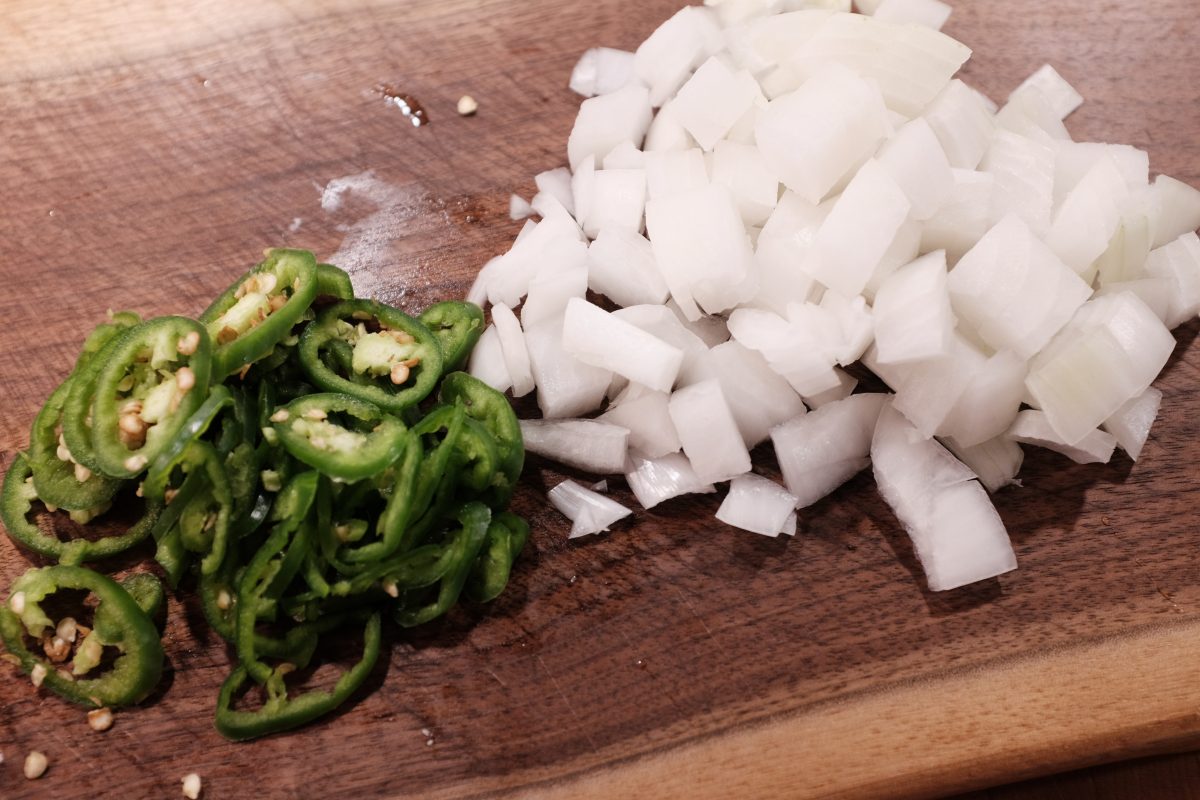
- 1/2 medium white onion
- 1 green long chile or jalapeño
I like regular harsh white vinegar for this recipe. You can substitute rice vinegar or apple cider vinegar but I would avoid using wine vinegars. Use regular brewed (Japanese style) soy sauce, not Korean soup soy sauce. Use an equal amount of honey if you prefer it over white sugar. You can leave out the chili altogether but, I would recommend just taking the seeds out if you don’t want any spice. The “greenness” of the chili adds alot of flavour here.
Process
This is one of my favourite soups. Hot and satisfying, it is especially good when you are feeling a little sick or run down. It is one of those meals that seems to instantly fortify the body much like my other favourite seolleongtang.
If you need a homemade kimchi recipe to go with any of your Korean cooking, click here.
If you have any comments or questions, please leave them below. Thanks for reading.
If you enjoy the content and would like to contribute towards website maintenance and development, you can make a donation here.
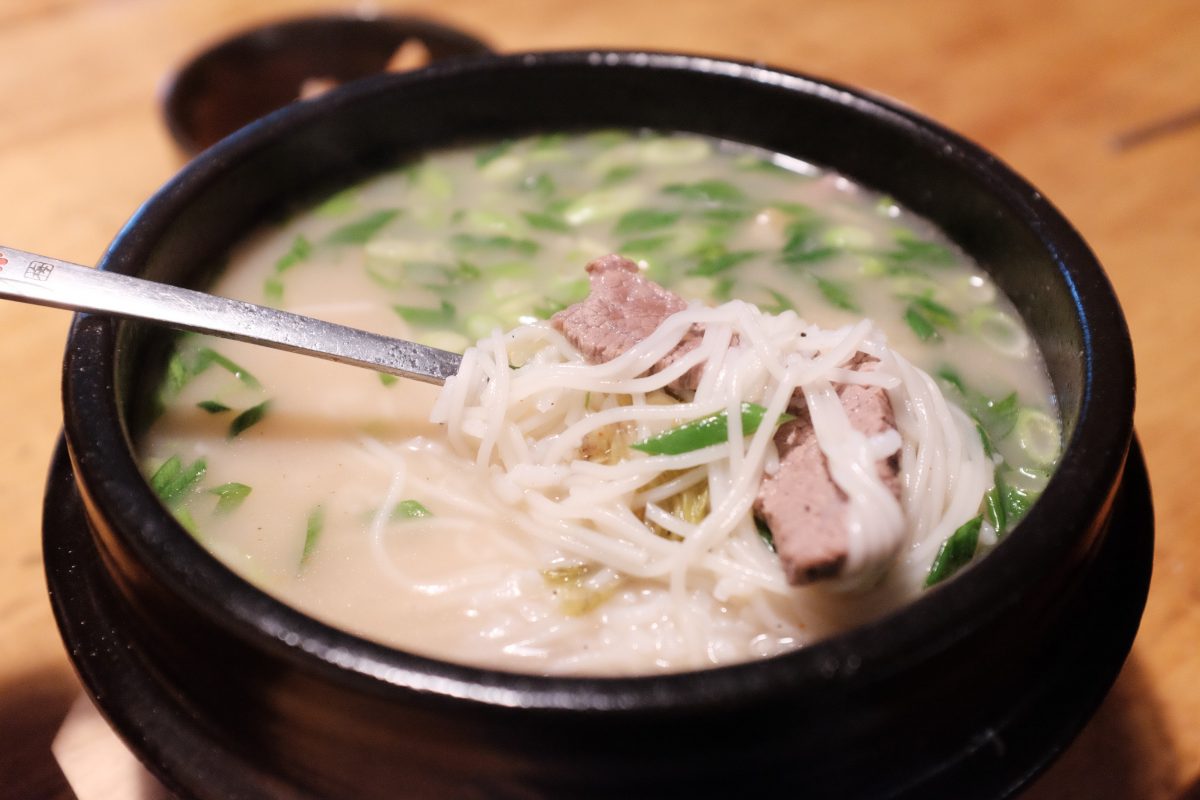
Seolleongtang
Seolleongtang is the first meal I ever ate in Korea. After a 15 hour flight and a long train ride, I finally arrived at my Insa-dong hotel sore, exhausted and hungry. The closest restaurant was directly behind the hotel, attached to the parking lot. This unassuming restaurant turned out to be one of the oldest in Seoul: Imun Seolleongtang. I had a big hot bowl of this plain milky beef soup and within an hour I felt completely refreshed. This simple soup seemed to erase my body’s memory of being crushed in an economy seat for the last 15 hours. It was like magic.
Since then, I have been back to Korea many times and I always start and finish my travels with this simple meal. Imun Seolleongtang has since received Michelin recognition and so it is busier (and more expensive) than ever with lots of tourists coming in to snap photos for instagram and tiktok. The staff seem to take it in stride, brisk and efficient, though maybe somewhat less friendly than I remember nearly 10 years ago. Also gone is the sloppy bucket of juicy and chunky kkadugi in the middle of the table and the big basket of chopped green onion. These now arrive in less bottomless portions after you order. But, even though some things have changed, the food is still as delicious as I remember and I still go to Imun as well as another smaller family run Seollongtang restaurant nearby.
Homemade seolleongtang
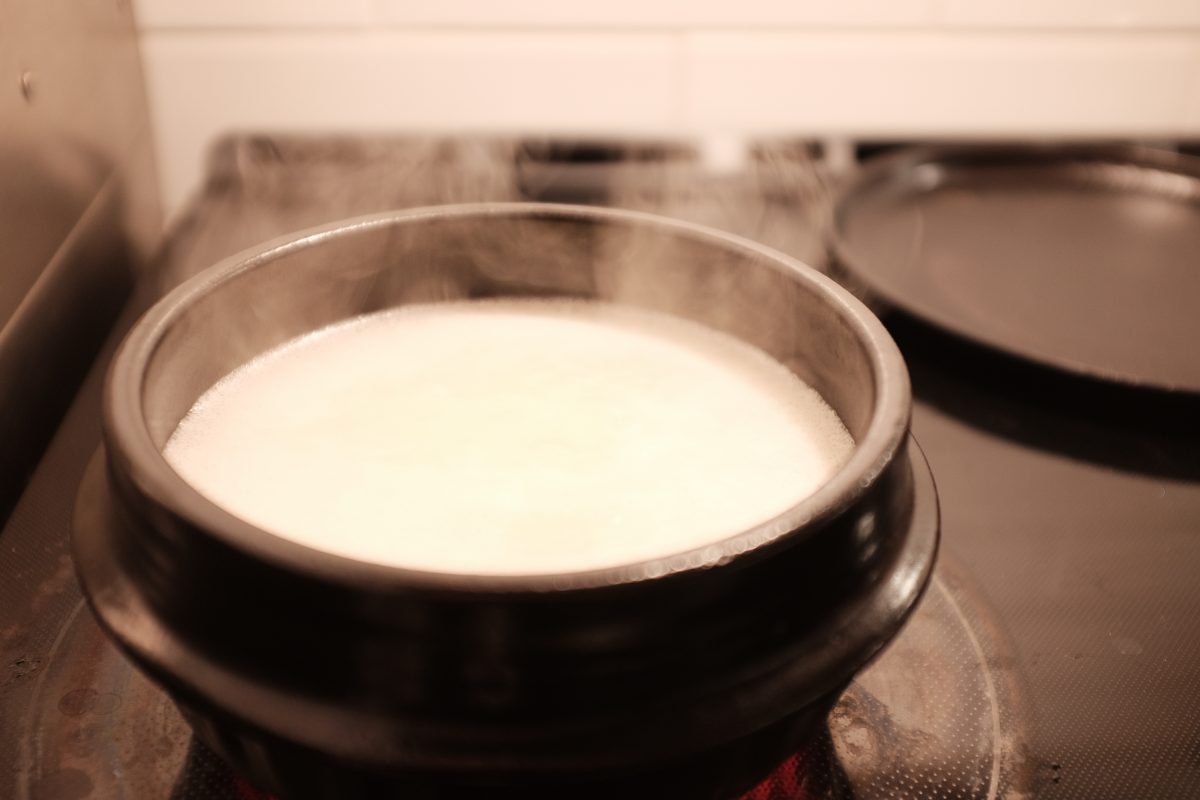
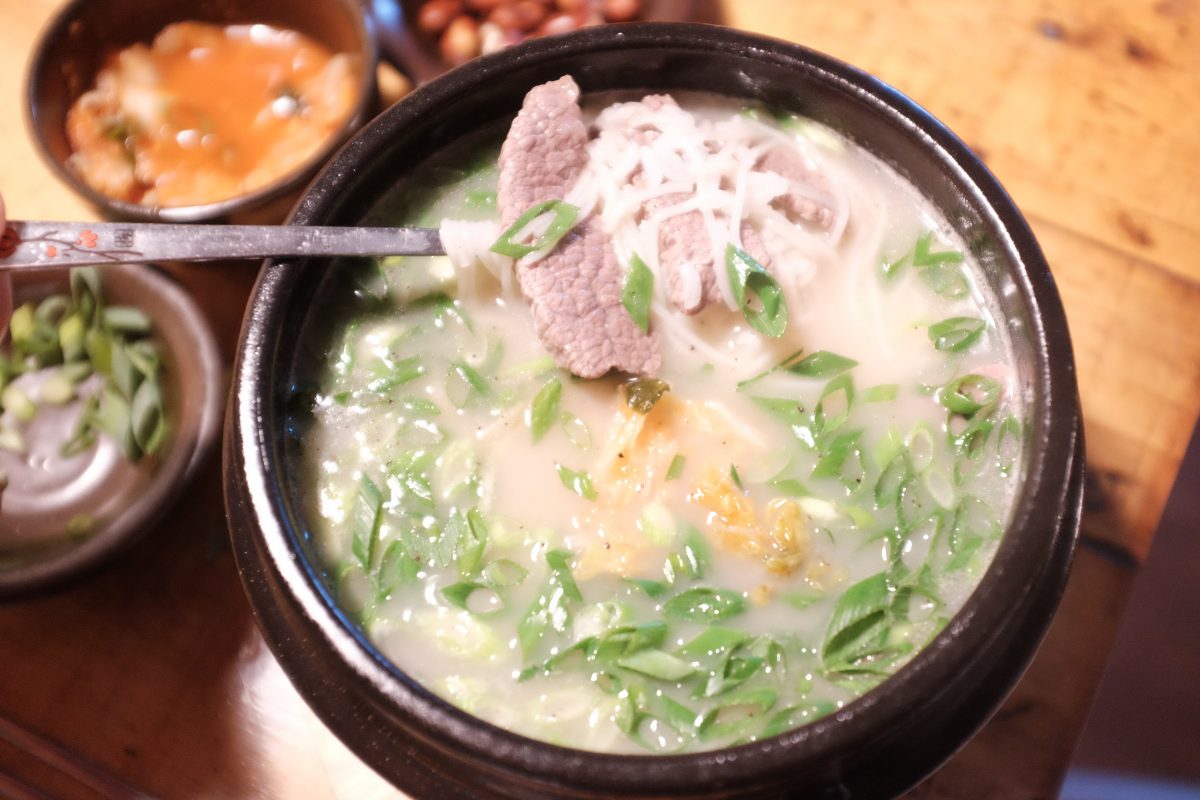
Seolleongtang always seemed kind of mysterious to me. Where did that milky colour come from? How was this simple soup so nutty and delicious? It arrives at the table completely bland and unseasoned but the addition of a little salt and pepper, kimchi juice and green onion turns it into something deep and complex and unforgettable.
Like a good food detective, I decided to launch a full investigation. After much reading and video watching, I discovered that the secret is really in the style of beef stock, in the process rather than the ingredients. The recipe below is a two-part process. First you will need to make the milky bone broth. Once you have this broth on hand, turning it into finished seolleongtang is a very simple and quick process. You can find the complete recipe for the beef bone broth by clicking here.
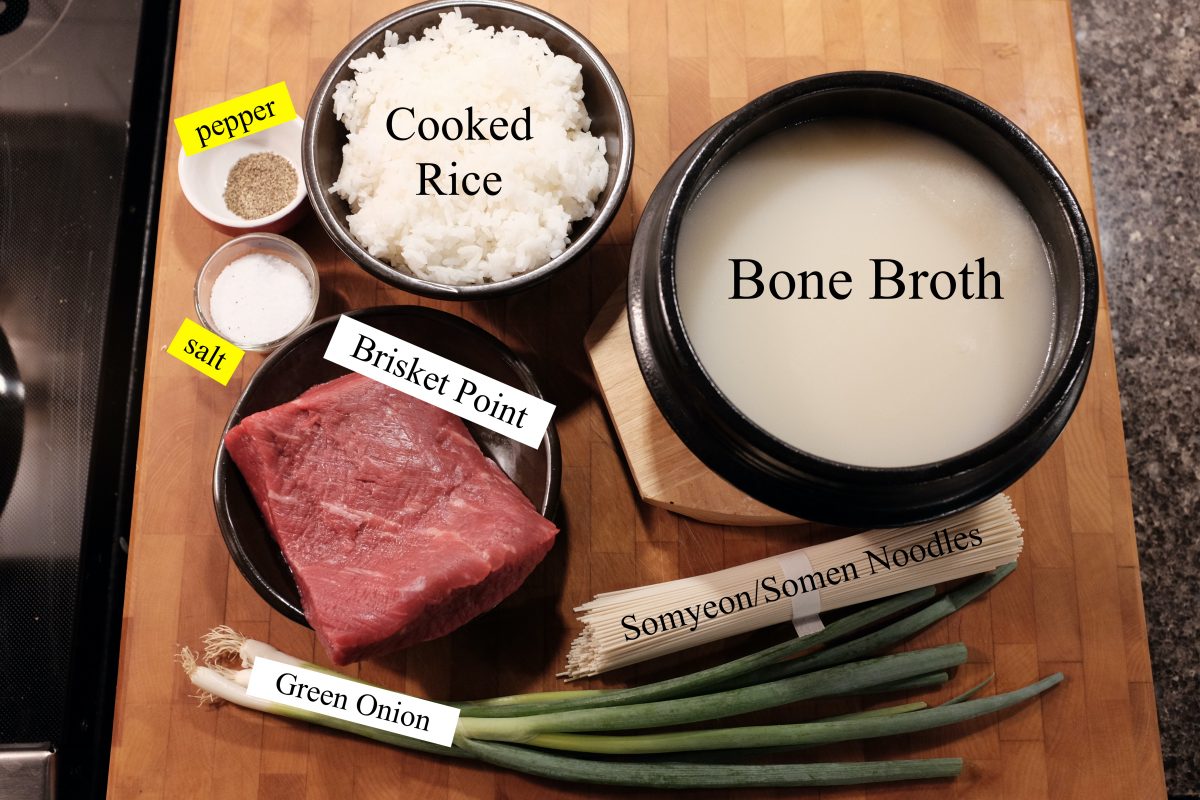
Ingredients
*this is for one big portion or 2 smaller portions
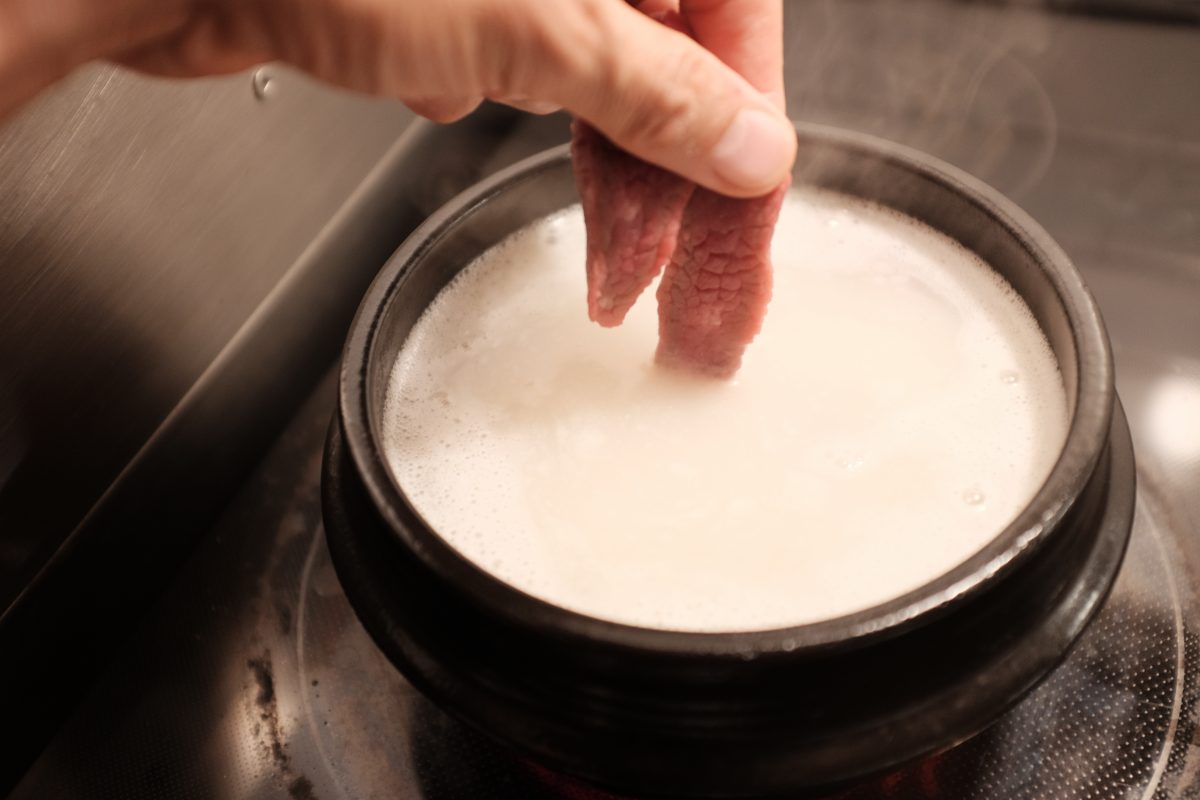
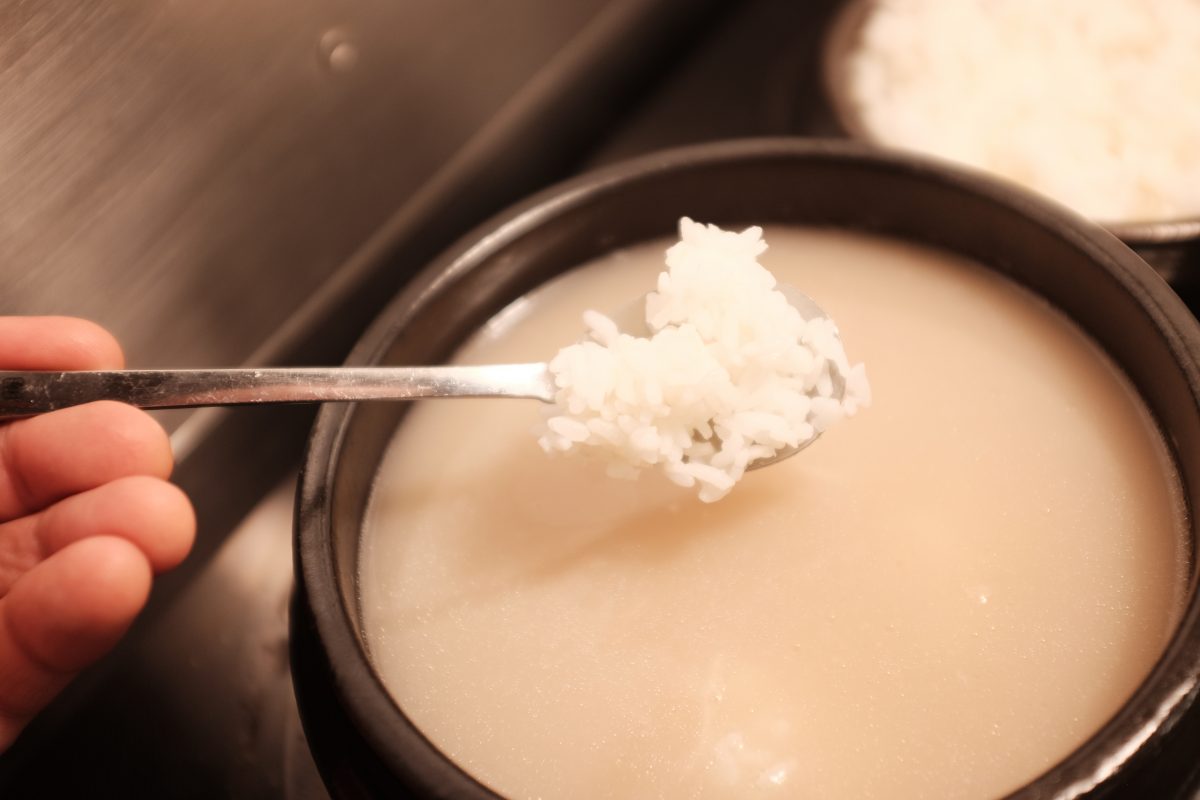
- 1 litre Korean milky beef bone broth
- 250gr beef brisket point
- cooked white rice
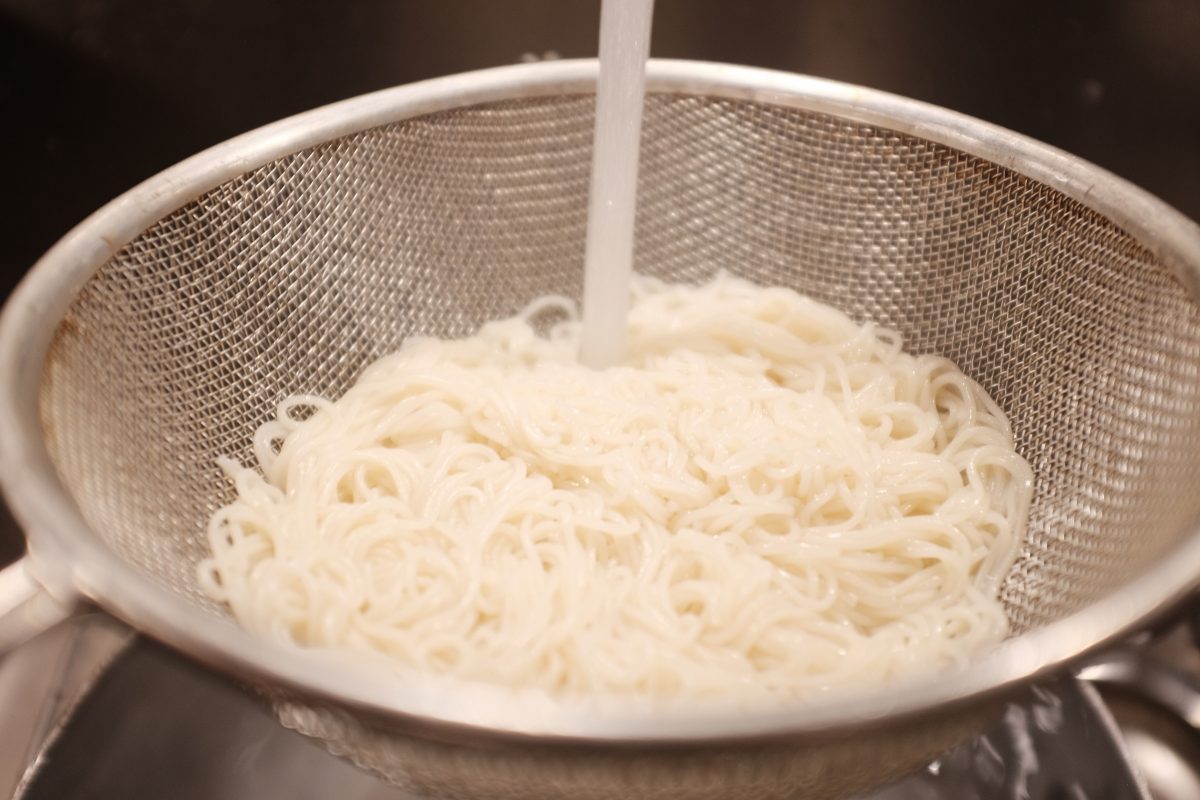
- cooked somyeon/somen noodles
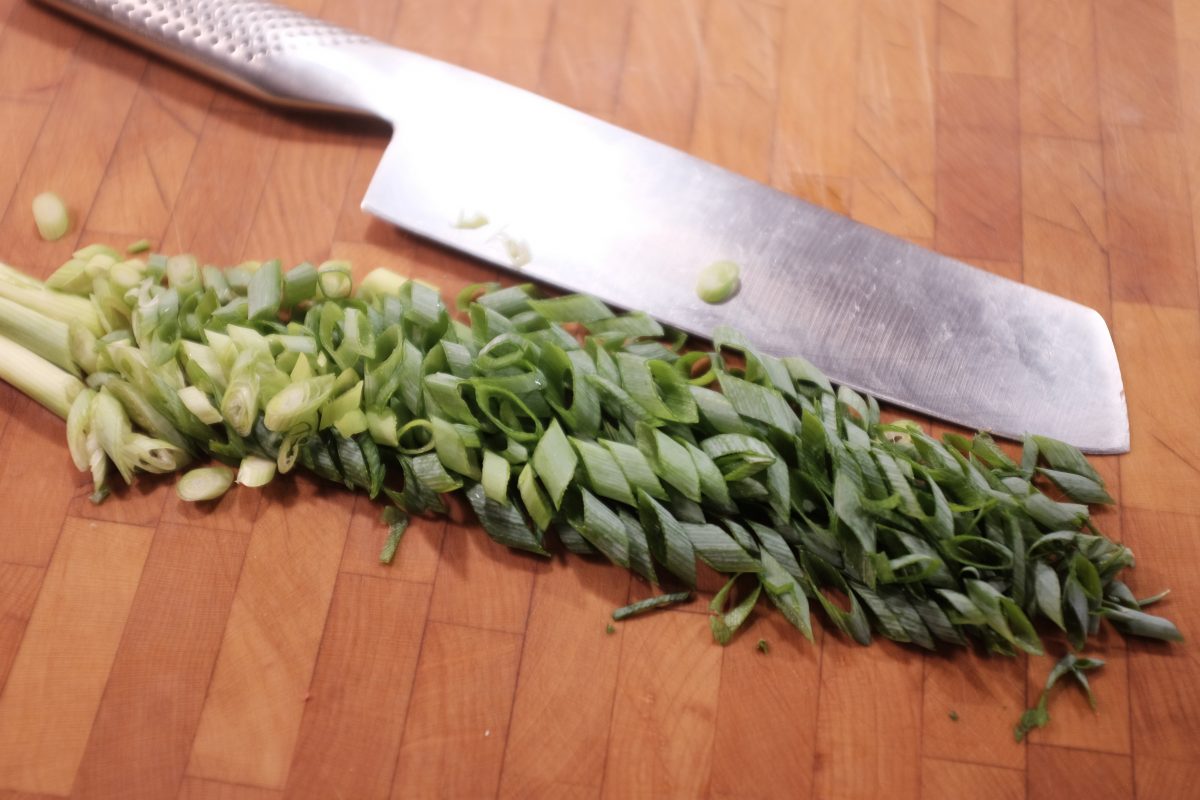
- 2-3 green onions (scallions)
- salt and pepper
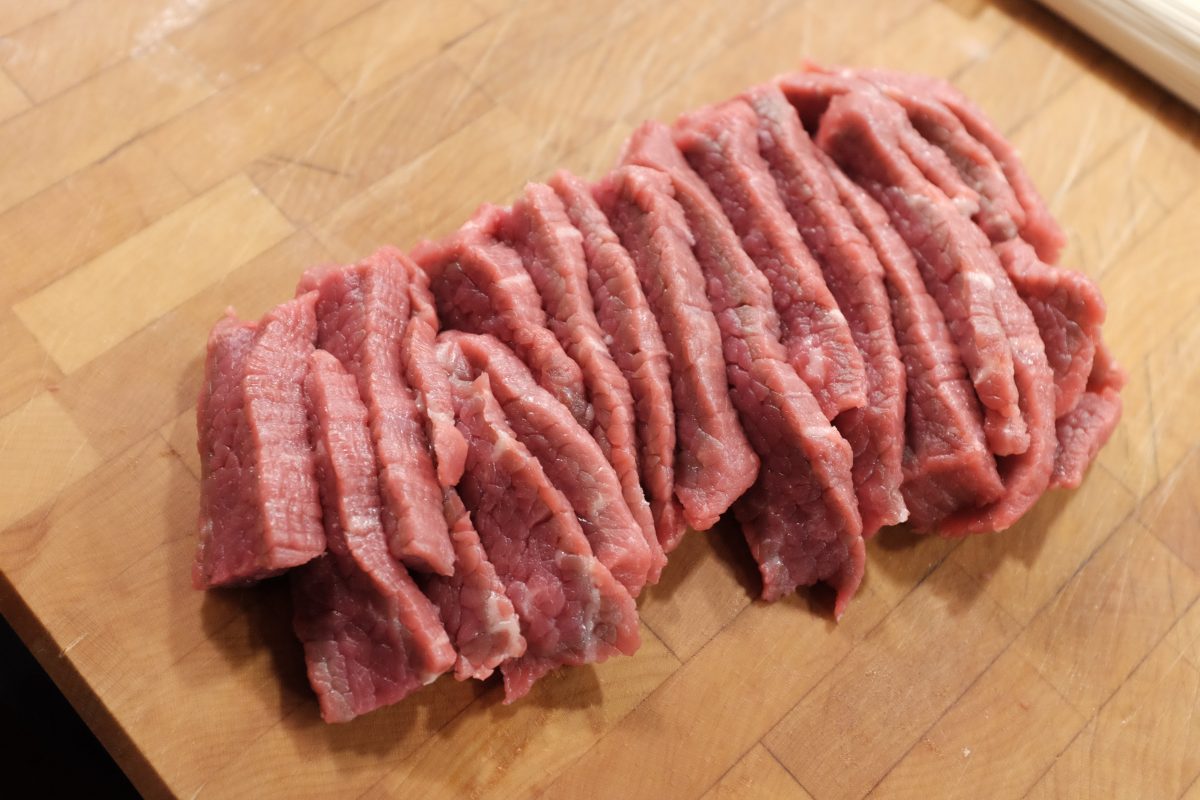
I used brisket point. You can use any beef you like. Tougher cuts will take longer to soften up and more tender cuts will take less time. I like brisket because it is somewhere in between. It has the deep beef flavour of a tougher muscle but is slightly more tender so takes a little less time to cook. If you like, you can soak the meat in water for a few hours to remove some of the blood but, this is optional.
Process


The verdict?
This turned out to be very very good. Maybe 4 out of 5 stars. One star off because, as good as it is, it doesn’t quite measure up to the flavour of Imun Seolleongtang in Seoul. But, honestly, I can say the same thing about all Korean food made outside of Korea. There is always a little something missing when you make these dishes yourself or, eat them in restaurants back home. I think a big part of this is the high quality of ingredients in Korea but, there is also generational knowledge and experience that adds flavour to these dishes and makes the magic hard to replicate. Imun Seolleongtang has been making this same dish for over 100 years and legend has it that the same stock pot has been continuously boiling fresh bones every day for the whole time!
Having said that, I am really happy with the way this turned out and I feel just as refreshed after eating a big hot bowl of this flavourful soup. 시원하다!
If you have any questions or comments please leave them in the space below. Thanks for reading!
If you enjoy the content and would like to contribute towards website maintenance and development, you can make a donation here.
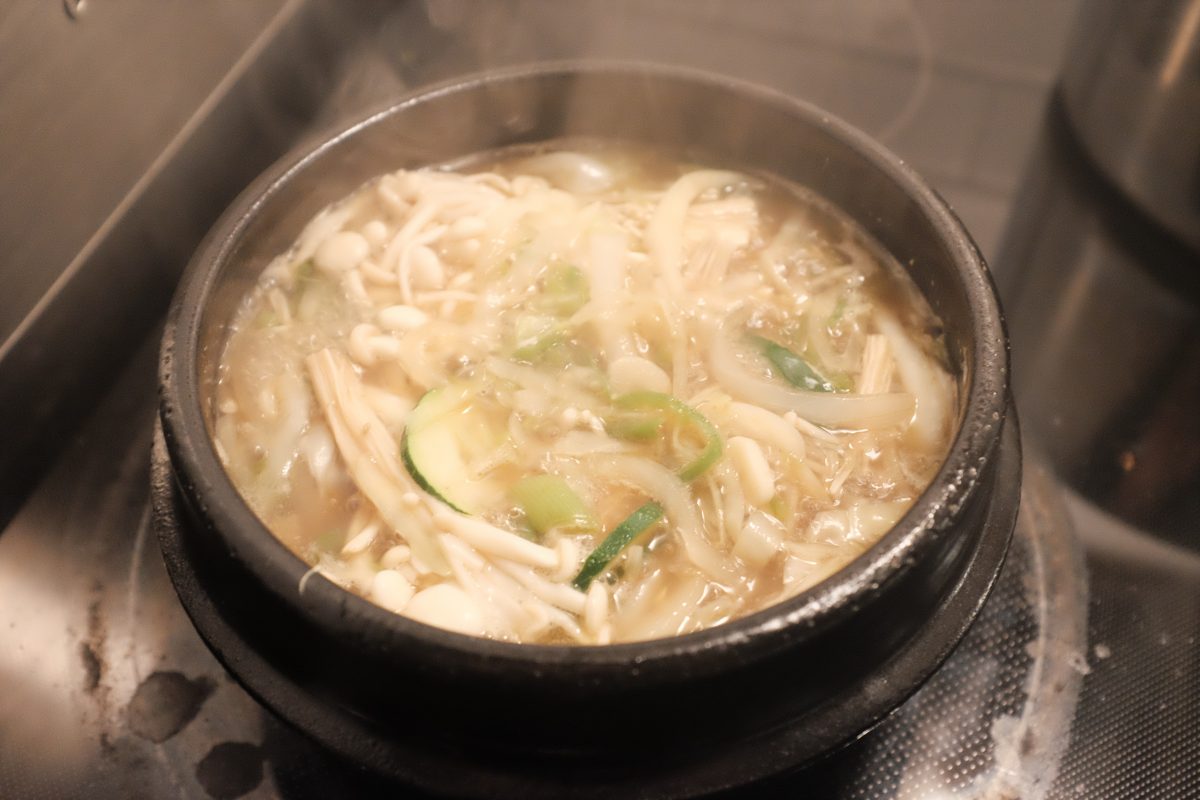
Bossam Leftovers: Pork and Vegetable Udon
Bossam Part 2:
Earlier I put up a recipe for a simple bossam. Towards the end, I mentioned that if you go easy on the salt in the braising liquid, you can use it to make another delicious pork dish. This is what I have done with the leftover braising liquid from that recipe: Pork and Vegetable Udon. This recipe made one huge portion but could very easily make 2 portions by adding more noodles.
Ingredients:
- Leftover braising liquid from Bossam recipe
- Leftover pork meat (if any) thin slices
- 1/2 onion sliced thin (the other half of the onion from the Bossam recipe)
- 3 cloves garlic sliced thin
- 2 green onions/scallions chopped
- 1 fresh green chilli pepper sliced into thin rounds
- 1/2 zucchini sliced thin
- 1/2 package of enoki mushrooms
- 1 cup green cabbage sliced thin
- 1 or 2 portions frozen udon noodles
I am using vegetables that I have in my refrigerator at the moment. You can substitute just about any vegetable you would normally put in a soup. You can use different mushrooms too. Different noodles could work as well. I like these Udon noodles. I usually find them at the neighbourhood Asian grocery store in the freezer section. They are convenient because they are frozen in single portions. If you don’t have leftover pork meat, don’t worry. The braising liquid has plenty of delicious pork flavour on it’s own. Sub in some extra mushrooms. I had enokis on hand but sliced king oyster mushrooms are even better!
Process


This took almost no time at all…
I think this probably took around 15 minutes to make. The leftover braising liquid from the bossam recipe is a perfect, rich and complex broth to cook vegetables and noodles in. This was a delicious meal that used up every last leftover from the previous night.
If you have any questions, comments or other ideas please leave them below. I always look forward to hearing from you.
If you enjoy the content and would like to contribute towards website maintenance and development, you can make a donation here.
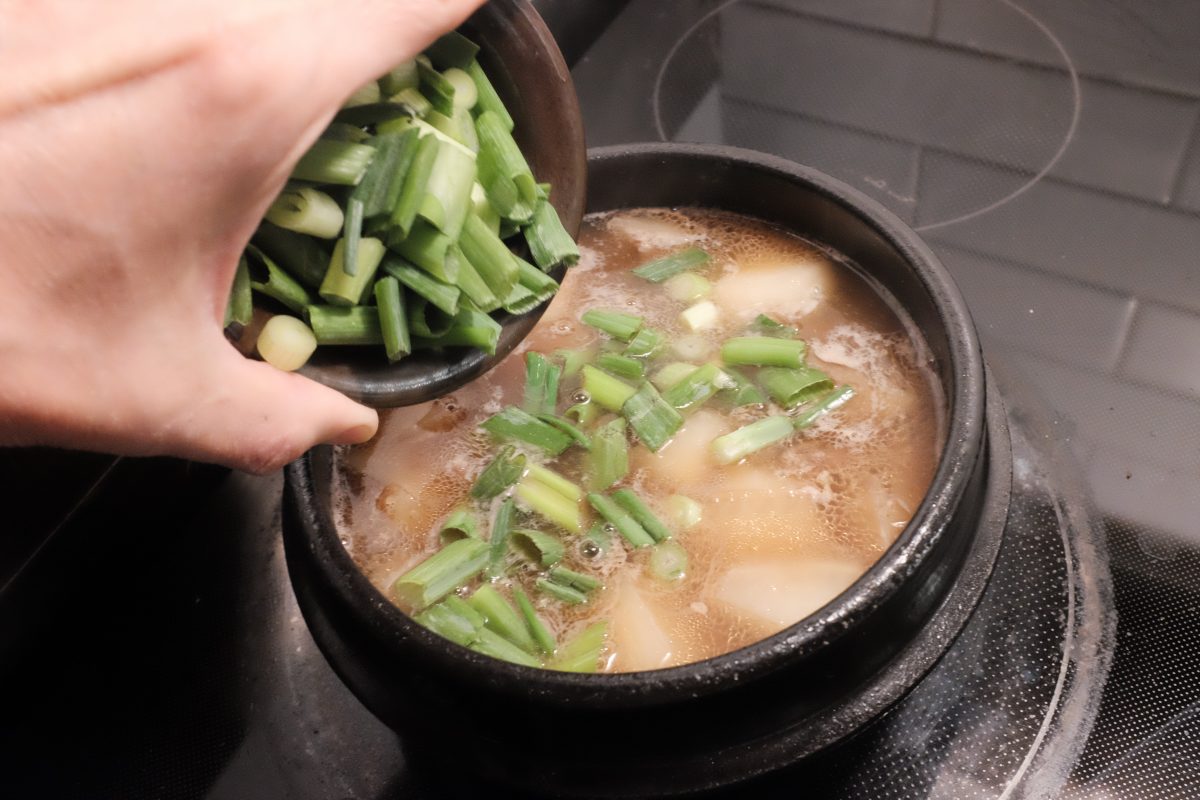
Beef and Radish Soup: Muguk
Korean beef and radish soup, or sogogi muguk, is a flavourful and nutritious soup which is easy to make quickly. There are only a handful of ingredients and everything is cooked in one pot.
Ingredients
- 150gr (5-6oz) beef brisket point sliced thinly against the grain
- 250gr (8oz) Korean radish
- 15ml (1 tablespoon) sesame oil
- 5 or 6 cloves garlic sliced thin or minced
- 15ml (1 tablespoon) Korean soup soy sauce (gukgangjang)
- 2 or 3 green onions (scallions)
- 750ml (3cups) water approximately
- salt and pepper
I used beef brisket in this recipe because I can get it easily and I like that it is lean and tender at the same time. If you can’t get brisket, you can use almost any other good cut of beef. Lean cuts from the round will be a little chewier but still delicious: cut them thin. If you want to put premium steak cuts in here, go right ahead. I have even made this with ground beef in a pinch.
Don’t use regular soy sauce. Korean gukganjang or soup soy sauce can be found at any Korean grocer. Regular soy sauce is a poor substitute. If you can’t find soup soy sauce, substitute with a good quality fish sauce.
The meat to radish proportion can vary. This one I am making has a pretty generous amount of meat. Feel free to use a little less or, even more if you want to load up on protein.
Process


I like to eat this with a bowl of rice and a couple of sides. Today I am having home made kimchi and a cucumber salad. I made kkakdugi yesterday but it is not quite ready yet. Otherwise I would eat it with this dish : )
This recipe will make enough for two medium portions or one very large portion.
If you have any questions or comments, please leave them below. I love to hear from you.
If you enjoy the content and would like to contribute towards website maintenance and development, you can make a donation here.
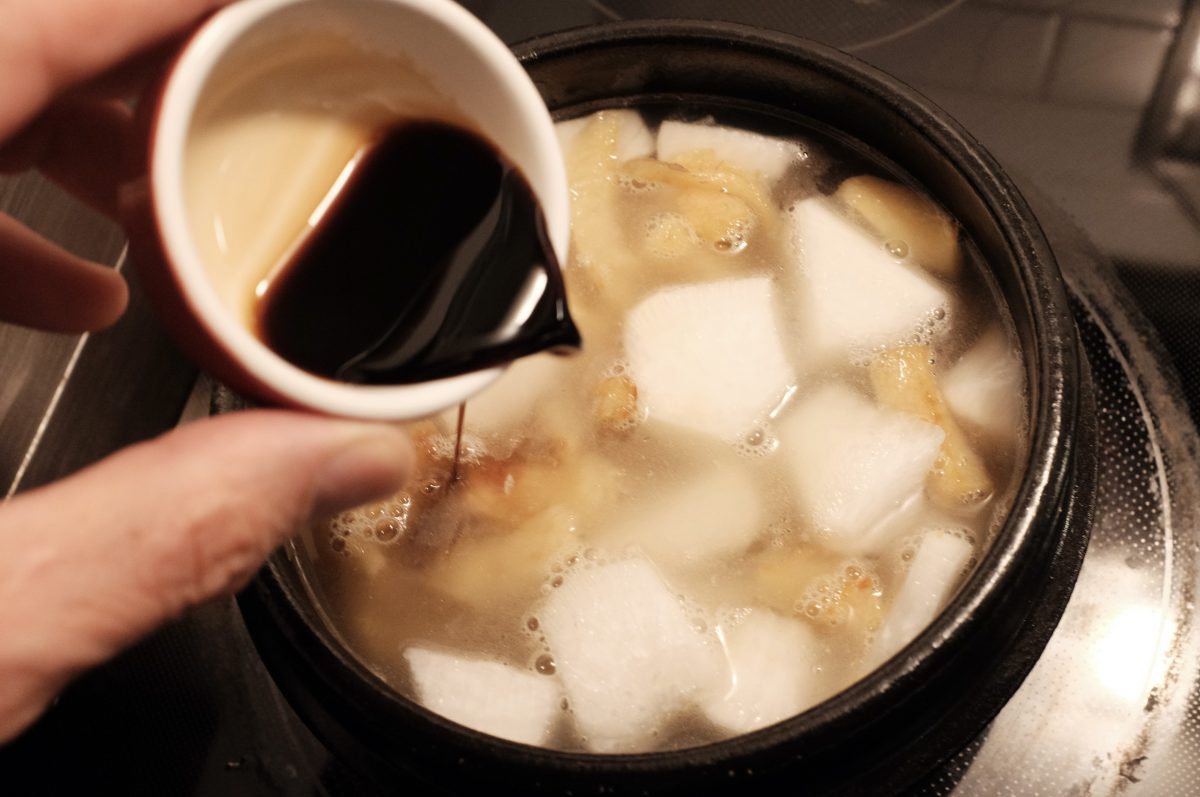
Dried Pollock Soup Bukeoguk
The start of a long relationship with Korean food
Years ago I hired a new cook who had recently arrived from Korea on a work visa. I soon started to notice them struggling a little with physical demands and mental focus. Everyday, they worked diligently and did an excellent job, never complaining once. But they were mentally exhausted and physically depleted by the end of every day. After a few weeks, they finally admitted to me that they were having a hard time eating North American food without feeling ill. On top of homesickness, they were basically….hungry all the time. And because they were hungry, they were exhausted.
The only way I could think of to make this situation better was to feed them. I asked them what they would eat if they could choose anything. The answer was Bukeoguk.
I knew nothing about Korean cooking and I had never heard of it. But, I searched for recipes and went to a Korean grocer for the first time and bought all the ingredients I needed. The next day, I made my first Korean food. And, for the few years that this cook worked for me, I continued to feed them one new dish a day. I gradually became a pretty good Korean cook and they gradually became healthier and happier.
They eventually moved on, as all cooks do. But my love for Korean food and cooking has remained with me. And for the last 10 years I have continued to learn methods and ingredients. By now, I must have made a hundred different dishes (probably more), even making my own doenjang, ganjang and gochujang from scratch. Makgeolli too.
Since that fateful meeting, I have cooked and eaten everything I can get my hands on. I have traveled to Korea many times and I have made many friends, even learning to speak the language at a basic level (so far). This story is a long one, too long to write here….and it’s not over yet! For now, I’ll just say “Thank you: 만나서 반가워요”
Ingredients:
- 60 grams (one big handful) dried Alaskan Pollock (bukeo) 북어
- 1 cup peeled and rough chopped Korean radish
- 4 cloves of garlic minced or sliced thinly
- 2-3 green onions (scallions)
- 1 tablespoon sesame oil
- 1 tablespoon Korean Soup Soy Sauce (guk ganjang) or fish sauce
- 1 egg beaten
- salt and pepper
- water (4-6 cups)
The amounts above are guidelines. This preparation is very simple and there is no delicate balance to upset here. If you like more fish, use more fish. If you like more radish put in more radish. The important thing is that everything is underwater and that it is seasoned well with salt or soy sauce/fish sauce. If you do follow the recipe exactly it will make a good soup. 2 smaller portions with rice and sides or one big portion.
Raw ingredients:

Process:
Soak dried pollock for 15 minutes or so in warm water until it softens up enough to cut or tear apart. Keep the soaking water…we will add it in later.

Chop or tear soaked fish into bite size pieces. Sometime there are a few little bones in the meat and tearing it by hand will help you find and remove them.

Cook the fish pieces in sesame oil for a few minutes until it is hot and aromatic

Add garlic. I like to slice my garlic thin but I think minced garlic is more common. Up to you!

Add chopped radish and cook for a few minutes until warm

Pour back the soaking water, enough to cover everything plus a few centimetres.

Soup soy sauce goes in. This stuff is not the same as regular soy sauce. It is much saltier and funkier. You should be able to find it easily at a Korean grocer but, if not, you can substitute fish sauce.
Bring to a boil and simmer for 15-20 minutes or until radish is cooked through. Now is a good time to add salt if needed. The dried fish contains salt, the soy sauce is very salty and the radish will release a lot of water. So I prefer for all these ingredients to cook completely before adding salt. Now is the perfect time to taste and adjust. Add salt if needed. Pepper too if you like.

Green onion goes in

Pour in egg and remove the pot from the heat. Wait until a raft of egg floats up before stirring it in.

Time to eat!

Bukeoguk is nutritious and easy to digest (also why it is known as a good “hangover soup”). It is simple and quick to make with only a few ingredients. I like to eat it with fresh white rice and a little homemade kimchi. Whenever I make it now, I can’t help but remember the first time I made it and the hungry person who got me started on my Korean cooking adventures.
If you have any questions or comments please leave them below. I am always happy to hear from you.
If you enjoy the content and would like to contribute towards website maintenance and development, you can make a donation here.