Posts in Category: Cooking
Cold Chickpea Salad
This is a recipe for a cold chickpea salad base. You can eat it just as it is here. It is delicious. But, you can also add just about anything you like to make the recipe suit your personal tastes. If you want to eat it over a few days, it is easy to add different ingredients to change it up. The ingredients I am including in this basic version can sit for a few days in the oil and vinegar dressing without degrading.
When I was little, especially in summer, there was always some kind of homemade cold salad in the fridge. Potato salad, pasta salad, egg salad… My new-Canadian parents refused to use air conditioning (or the dishwasher haha) so it was always nice to have something ice cold to snack on in the hot and humid weather! This recipe is the latest variation and I ate it at mom’s house recently.
Chickpeas are a great source of cheap protein, fibre, vitamins and minerals. And they taste great!
Ingredients:
- 400gr (2 cups) dry chickpeas
- 1/2 red onion small dice
- 1 red pepper small dice
- 3 green onions (scallions) sliced
- 1 carrot
- 2 cloves of garlic minced
- 2 Tablespoons hot chillies in oil (or chopped fresh chillies)
- 2 Tablespoons diced dill pickles
- 90-100ml (6 tablespoons) olive oil
- 45-50ml (3 tablespoons) vinegar
- 1-2 teaspoons salt
- 1-2 teaspoons black pepper
- 3 teaspoons ground cumin (optional)
I am using dry chickpeas because I like the flavour and texture. Soaking and cooking them is very easy but it takes a little more time. Feel free to substitute an equal amount of canned chickpeas. Just be sure to rinse them thoroughly in cold water to remove all the slippery brine.
Use a good extra virgin olive oil. I have used apple cider vinegar in this recipe but any good vinegar works. As for the chillies, I am using delicious chopped red chillies in olive oil which I recently found at a local Italian grocery. You can substitute with any fresh chopped chilli or leave them out if you don’t like the heat.
Process
Before anything else, we need to rehydrate (soak) the dry chickpeas.


Variations
As I mentioned at the start, I keep this basic recipe limited to the veggies that will be able to sit in the oil and vinegar for a few days without spoiling. Feel free to add anything you like to this starting recipe just before eating.
Some other things I have used:
- blanched or raw asparagus
- corn
- zucchini
- celery
- chopped kimchi
- diced sour apple
- parmesan cheese
- any and all fresh herbs
- crispy diced bacon
- tobasco, cholula or any other hot sauce
This kind of a salad is a good match for any picnic foods and especially grilled meats. And, although it is a cold salad, there is no reason why you couldn’t heat it up in a pan and serve it hot as well. As a warm dish, I think it would work perfectly under a piece of grilled fish.
Hope you enjoy. If you have any questions or comments or interesting variations, please leave them below. I am always happy to hear from you.
If you enjoy the content and would like to contribute towards website maintenance and development, you can make a donation here.
Bossam Leftovers: Pork and Vegetable Udon
Bossam Part 2:
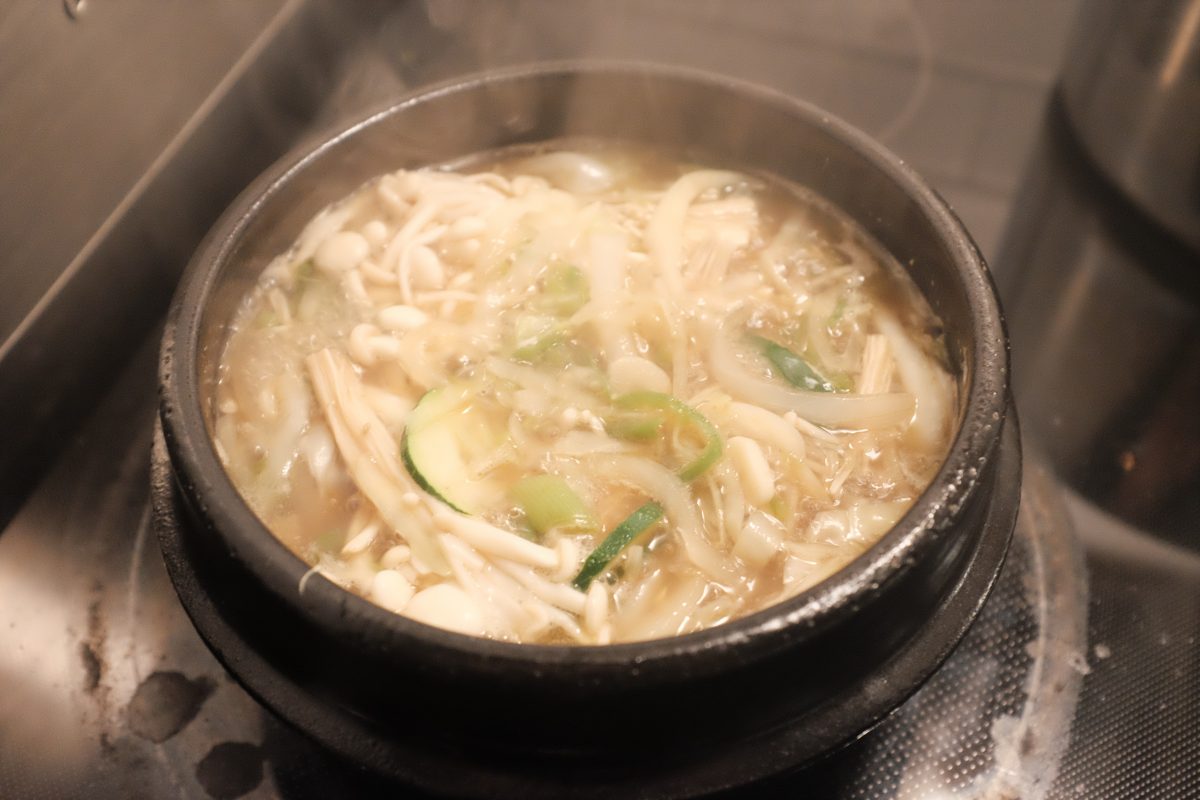
Earlier I put up a recipe for a simple bossam. Towards the end, I mentioned that if you go easy on the salt in the braising liquid, you can use it to make another delicious pork dish. This is what I have done with the leftover braising liquid from that recipe: Pork and Vegetable Udon. This recipe made one huge portion but could very easily make 2 portions by adding more noodles.
Ingredients:
- Leftover braising liquid from Bossam recipe
- Leftover pork meat (if any) thin slices
- 1/2 onion sliced thin (the other half of the onion from the Bossam recipe)
- 3 cloves garlic sliced thin
- 2 green onions/scallions chopped
- 1 fresh green chilli pepper sliced into thin rounds
- 1/2 zucchini sliced thin
- 1/2 package of enoki mushrooms
- 1 cup green cabbage sliced thin
- 1 or 2 portions frozen udon noodles
I am using vegetables that I have in my refrigerator at the moment. You can substitute just about any vegetable you would normally put in a soup. You can use different mushrooms too. Different noodles could work as well. I like these Udon noodles. I usually find them at the neighbourhood Asian grocery store in the freezer section. They are convenient because they are frozen in single portions. If you don’t have leftover pork meat, don’t worry. The braising liquid has plenty of delicious pork flavour on it’s own. Sub in some extra mushrooms. I had enokis on hand but sliced king oyster mushrooms are even better!
Process


This took almost no time at all…
I think this probably took around 15 minutes to make. The leftover braising liquid from the bossam recipe is a perfect, rich and complex broth to cook vegetables and noodles in. This was a delicious meal that used up every last leftover from the previous night.
If you have any questions, comments or other ideas please leave them below. I always look forward to hearing from you.
If you enjoy the content and would like to contribute towards website maintenance and development, you can make a donation here.
Bossam Braised Pork Belly
This is a very basic version of bossam. The main event here is the meat. Fresh pork belly is braised in a liquid made with strong aromatics to flavour the meat and to soften some of the gamey aroma of the pork.
It can be served with kimchi and various sides, wrapped in a leaf of cabbage, perilla or lettuce.
There are a couple of good recipes here and here which include all the components for a more traditional Korean preparation with pickled Napa cabbage leaves and spicy shredded radish. This is a delicious way to eat it but I am going to do something a little different with things I already have in the refrigerator.
Ingredients for Braised Pork
- 1 kg (around 2.5lb) pork belly
- 1 small chunk (25gr) fresh ginger sliced
- 12 garlic cloves roughly chopped
- 1/2 onion
- 2 green onions roughly chopped
- 30ml / 2 tablespoons doenjang
- 15ml / 1 tablespoon instant coffee
- 1 tablespoon whole black peppercorns
- 1.5 litres / 6 cups water
Other Ingredients:
Once the pork is done, you will need something leafy to wrap it in. You may also want to add other fillings to your pork wraps. This can be anything from kimchi to fresh crunchy veggies. Sometimes I even like a little bit of nice mustard in them. This time around, I will use:
- red leaf lettuce, washed, dried and separated into leaves
- perilla leaf (kkaennip) washed and dried
- napa cabbage kimchi
- Korean radish kimchi or (kkakdugi)
- pan fried anchovies with peanuts (myeolchi bokkeum)
Process


Serving
Serve the pork slices with sides of your choice and leaves to wrap it with.


What about the leftover braising liquid?
Store any leftover meat in the braising liquid. Reheat it covered in the liquid as well.
The first time I made this, I noticed that the leftover braising liquid is actually very tasty. You can’t really notice the coffee as a distinct flavour. The liquid is just a warm and delicious pork and doenjang flavour. The only problem is that it is a little too salty.
The next time I made it, I decided to remove extra salt from the recipe, using doenjang only as the main seasoning. The meat is still delicious and can be salted a little after cooking if you think it needs it. But, keep in mind, you are also eating this with kimchi or maybe salted shrimp or other well seasoned add ons so very salty meat is not so necessary.
Once you reduce the salt, you are left with a delicious pork soup base. When the meal is done, I usually strain out all the solids and refrigerate it. The next day I combine it with shredded cabbage, the other half of the onion, mushrooms and frozen udon noodles, a little of the leftover pork and chopped scallions. It is surprisingly delicious! Find that recipe here.
If you have any questions or comments, please leave them below. Look forward to hearing from you.
If you enjoy the content and would like to contribute towards website maintenance and development, you can make a donation here.